96 Producer’s Edge Magazine Fall Winter
V
IN
TA
G
E
SE
R
IE
S
A
K
A
I S-950
REVISITED
by Sean Maru
The Akai S-950 is not just an old school
sampler. It is THE old school sampler.
Introduced in 1988, it became the weapon of
choice for a crowd of would-be legends (DJ
Premier, Large Professor, Lord Finesse, Pete
Rock, Prince Paul and others) and played a
big role in many classic albums in the years
that followed.
T
his installment of Vintage
Series will look at the Akai
S-950. I will not spend much
time detailing all of its features.
A PDF of the manual is available
from Akai’s website and it covers
them very well. Instead, I will
revisit the workflow it encourages
and of course, its gloriously
gritty sound. I will do so from the
perspective of someone who has
a lot of experience with hardware
samplers but who has never
had the opportunity to push the
buttons on a 950.
Sizing it up
Upon first glance, the
950 is all business.
It is almost clinical in
appearance. There are no
trendy graphics or other
signs of pandering to a
youthful market. Clearly,
this machine is designed
for professionals. Keep
in mind that in the late
1980s, most hardware samplers were
purchased for and used in professional
studios, mainly as a sound design tool
or for flying in the occasional sound
effect. It is only fitting that the 950 looks
the part of a no-nonsense workhorse.
Something about it makes you feel like
you should be wearing a lab coat or
talking to mission control and I mean
that in a good way. It totally plays into
the “mad scientist” vibe many producers
enjoy. Besides, whatever the unit lacks
in form it makes up for in function.
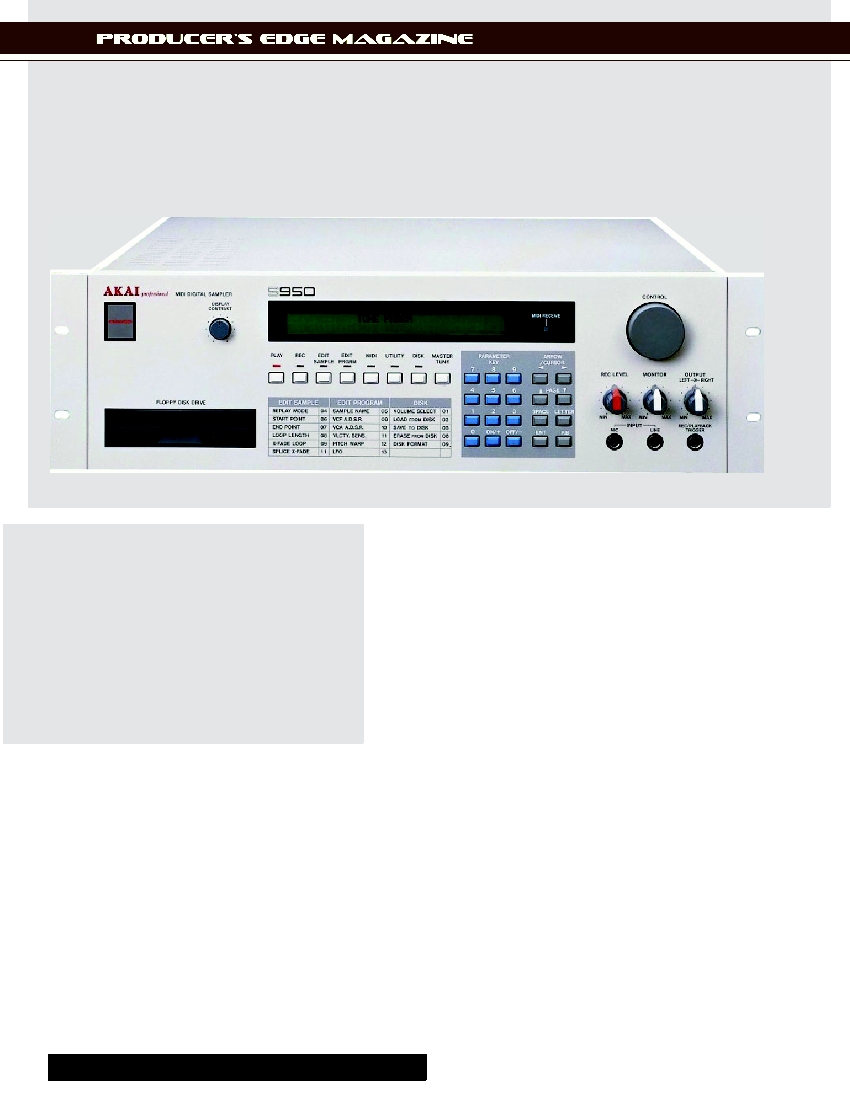
Layout & Architecture
The first things you notice are the
dedicated controls on the front panel.
Akai wisely gave dedicated knobs
to parameters over which you need
immediate control such as record,
monitor and output levels. It should be
a law that all samplers be set up this
way. The 950 even gives you a handy
contrast knob, which makes a lot more
sense than making you strain to see
the display in order to adjust it.
There are eight page buttons in the
middle of the unit (Play, Record, Edit
Sample, Edit Program, Midi, Utility,
Disk and Master tune). After my initial
explorations, I realized I spent most of
my time in the record, edit sample, edit
program and disk pages. Record has
several pages where you specify the
sample rate, sample duration and root
key of your sample. The Edit Sample
page is where you trim and loop
samples. Edit program is where you
set up keygroups, filter and envelope
settings, etc. You will use the Disk
page for loading, saving and deleting
sounds. To navigate the submenus hit
the page or cursor buttons on the right
pg_0002
97 Producer’s Edge Magazine Fall Winter
side and use either the 10 digit key pad
or the control knob for entering values.
Between using the short cuts (which
are printed on the front of the unit)
and simply remembering how many
button presses it take to reach a given
parameter, I bet an experienced user
could literally operate one of these
blindfolded.
Like a lot of old school hardware,
the 950 provides a wealth of output
channels. The 950 has 10 unbalanced
outputs, which can be used to route
individual sounds to your mixer/DAW.
How you assign sounds to their outputs
depends upon the role you want the
950 to play in your production. If you
are using it for drums only, then assign
each sound to a separate output. This
will allow you to EQ, effect and route
each sound independently. The clarity
of your mix will improve because the
adjustments you make to one sound
will not adversely affect the other. If you
are trying to make an entire song using
only the 950, then allocate one channel
each for the kick, snare and hats. Then
use the rest of the channels for your
samples. I put similar sounds (e.g.
chops of the same instrument, sounds
in similar EQ range, etc.) on the same
channels. Anytime you assign different
sounds to the same channel you will
have to compromise somewhat but
planning your assignments thoughtfully
will minimize them.
For my experiments, I tried to keep
different drum sounds on separate
channels and patched them to my
analog mixer. From there the signal
was fed into the audio interface on
my DAW. Although I love being able
to save and recall mixers settings in
Logic, I have to say it is a lot more fun
mixing on my Mackie 1642. Physically
turning the knob on an EQ pot to locate
a sounds sweet spot is a feeling that
cannot be replicated using a mouse.
To feed sounds to the 950, I just ran
a cable from the send outputs of my
turntable mixer into the mono input
on the front of the 950. Make sure
you have a stereo to mono cable and/
or adapter or your will have phasing
problems.
The 950 has a refreshingly simple
architecture. The raw sounds you
record are referred to as samples,
which are then mapped into one or
more keygroups that are contained
within a program. Keygroups are
where you set up envelope shaping,
filtering, fine-tuning, vibrato and output
assignment. Sounds can be set up to
cross switch based on their position on
the keyboard or velocity. Velocity cross
switching is very useful, especially for
creating more expressive drum kits.
A kick, snare and hi hat sample can
become a dynamic instrument when
you make variations of each using
filtering (to mute the high end slightly),
decay settings (to simulate a choked
hit) or simply changing the volume
and trigger each by simply hitting the
keys harder or softer. The interactivity
this provides makes sequencing feel
more like making music and less like
programming. Although it takes a few
minutes to set up a keygroup, you can
save it to disk and use it as a template the
next time you build a kit and put the time
saved into the rest of your production.
Sampling
S
ampling on the 950 is very quick
and easy. Hit the record button and
then the page key to step through the
submenus until
you reach the
level set screen.
Make sure you
have a nice and
hot signal (the
signal should fill
up the screen
during peaks but
not “live” there).
Hit a key to start
sampling or play
your source and let the threshold you
set trigger sampling. That’s it. If you
are using the same settings for each
sample then you will spend most of
your time hitting the page key to get to
that last screen. The process is very
hands-on and with a little practice, you
can sample sounds as fast as you can
find them.
Time Management
Although my first real sampler (a 1989
Ensoniq EPS Classic) had similar
memory limitations, the 950 reminded
me how soft I have grown in terms
of resource management. My current
DAW has 2GB of memory and half
a Terabyte of hard drive space, so
I never worry about having enough
time to capture all of the sound I want.
Consequently, I tend to sample long
passages, thinking that I will chop
it up and make sense of it later. The
danger of that approach is your beat
has no focus from the start. If you
have picked up the same bad habit,
the 950 will break it for you. Its meager
sample time demands that you know
what sound you are after. Even then,
you have to be alert when sampling to
ensure you don’t miss
part of it. A few time-
honored tricks can
help though. First, you
can play the record
at 45 rpm and pitch
it down an octave
inside of the sampler.
A benefit of doing this
technique on the 950
is that when it interpolates the sample
to play it at the lower pitch, it imparts
a nice crunch its sound. Although
the 950 can be set to start recording
BEFORE YOU SAMPLE:
•Make sure you are sending a strong signal out of each
component in your signal chain to maximize your signal
to noise ratio.
•Turn down or mute unused mixer channels that may
introduce noise to your signal.
•Use gentle EQ to emphasize the character of the sound
you are sampling before sending the signal to the 950.
How is the Akai S-950 different from the S-900.
•Maximum sampling rate increased from 40kHz to 48kHz
•RAM capacity increased from 750kb to 2.25MB
•Max number of samples/programs increased from 32 to 99
•New functions added (cross-fade looping, pre-trigger
recording and time-stretch)
•Can now take both HD and DD disks
•New options include the ME35T trigger-to-MIDI interface
and the 13-pin Voice output plug
pg_0003
98 Producer’s Edge Magazine Fall Winter
when it reaches the threshold you set,
it sometimes cuts off the beginning of
samples so I tend to start recording
manually. When using this approach, it
can also be helpful to cue up the first
beat of the sound you want to sample
and scratch it a couple of times before
releasing the vinyl so it will be “up to
speed” as soon as sampling starts.
The 950 employs a couple of functions
that will help you manage your
memory. First, you can choose from
a wide variety of sample rates. It is a
good idea to sample slightly higher
rates for your main samples and
reduce the rate for less important ones
(percussion, sound effects, etc.). You
can also get away with using a lower
rate for samples, like kick drums, that
won’t use the upper part of the audio
spectrum anyway. The 950 will also let
you resample sounds at half bandwidth
after the fact. This not only frees up
memory but also grunge up the sound
a bit more, if that is what you are after.
Trimming & Timing
Once you sample, the next step will
be to trim the sample start and end.
Although the 950’s “Auto” feature can
search for the start point for you, I
found myself dialing the sample start in
manually most of the time. When doing
this, it is helpful to play a key an octave
or two below the root key so you can
hear the attack in slow motion and
locate any dead space or clicks that
need to be deleted. If you are looping a
phrase, the sample end may flam with
the beginning as it loops. To fix this,
you need to bring the sample end down
enough to cut out the first beat of the
unneeded measure. There are a couple
of techniques you can use to avoid
having to listen to the entire sample
repeatedly. First, you can find the start
point, and then hit “Discard before start
and after end” to truncate the sample.
This will reset the starting point to zero.
Then you can temporarily increase the
sample start value so you can audition
the sample end after hearing the last
couple of beats instead of waiting for
entire bars to play out. Don’t forget to
bring the sample start value back down
to zero before discarding the sample
end. An alternative method is to trim
the sample to the point where the extra
beat is just starting to come in and
then reverse the sample to fine tune.
This way you can trigger the sample
repeatedly while bringing the sample
end down as you listen for the point
where the last beat vanishes. Then
reverse the sample again and listen to
the loop going forwards to make sure it
loops correctly.
Chopping on the 950 is done by
copying the sample a few times and
trimming the start and end of each copy
to isolate the sections you want. This is
definitely much slower than chopping
in recycle, Kontakt, etc. However,
faster is not always better. Whereas
the average chopping program will
give you the politically correct eighth
note or sixteenth note chops in an
instant, the 950 requires you to get your
hands dirty. You have to cycle through
the loop a few hundred milliseconds
at a time. The extra time spent often
yields a chop that lives in the gray
area between obvious divisions. In
this regard, you could say that while
programs today are too smart for their
own good, the 950 is blissfully ignorant
of the assumptions that can box your
music in.
One of the more important features that
the 950 introduced to the line was time
stretching. In addition to doing a good
job of helping you get your sample on
beat without changing the pitch, it was
also good for generating effects when
abused. I found that I could get some
interesting artifacts by time shrinking
the sample by 50%, then stretching it
by 200% and then filtering the result.
Artful manipulation of the “D-Time”
parameter also introduced interesting
results. Longer D-Time values gave
samples a tremolo type effect (which
can do interesting things to a flute
sample) and shorter ones made
samples sound more metallic (good
for “robotic” voices and other clang
effects).
I tended to use the time stretch more
for effect than actually getting things on
beat. I honestly had more fun working
completely old school and just using
the fine pitch control to get all of my
instruments to loop correctly. Although
you risk a major tonality train wreck, it
is more fun to massage the pitch of a
sample until it loops just right than it is
to think about percentages. Besides
some times the dissonance you get from
samples that are not perfectly tuned
can be a good thing. Another bonus
is that working this way forces you to
make the sample loop to the rhythm as
YOU hear it and this personal stamp
builds a little bit of your personality into
the track from the start.
Sure the Akai S-950 looks all business but it developers had a sense
of humor. Just execute the “halve bandwidth” function one too many
times and all of the page lights will begin to blink and the 950 will
actually mock you.
pg_0004
99 Producer’s Edge Magazine Fall Winter
Looping
Samples can be played un-looped,
looped forwards or as alternating
loops. The 950s auto looping features
proved to be useful. I don’t loop many
“real” instruments these days but the
few times I did during my testing, the
auto loop feature proved to be quicker
and more musical than my first couple
of stabs at doing it manually. In addition
to making sampled instruments decay
more naturally, auto looping can help
when building instruments from single
cycle loops. If you are not afraid of a
little math, single cycle looping can
provide another way to design sounds
without using a lot of memory. In short,
you sample, tune, layer and filter single
cycle loops of samples to build more
complex instruments. The samples can
be anything. Although, I usually copy a
sample from the song I am working on
and build a lead instrument from that.
Alternating loops continuously
play the sample forward and then
backwards. If you are having trouble
looping a sample forward, an
alternating loop can sometimes work.
When sampling records, applying a
bidirectional loop to the last eight or
sixteenth note of the bar can hide an
overzealous vocalist who chimes into
early and other flies in the ointment.
Filtering
Not only is the sound of the 950 old
school, but it encourages you to knock
the dust off old techniques. Using the
low pass filter to isolate the bassline is a
bread and butter technique of the early
90s and although is it is not innovative
to do in 2008; it sure is a lot of fun. Just
lower the frequency cutoff for verses
and let the unfiltered sample sing out
during the hooks (along with whatever
supporting samples you added) and
you have a song. You can bring the
unfiltered sample in during the verses
to remind the listener of what’s coming
in the hook. Granted these days this
might sound dated but if your emcee
is doing his job and you have chosen
you sample(s) wisely, no one will care.
In fact, I think this flavor is kind a part
of hip-hop’s collective consciousness
at this point so it is hard to go wrong.
Nevertheless, the 950 does have tools
to help you expand on this formula.
For one thing, you could time correct
different pitches of the filtered sample
and set up a keygroup to allow you to
play the variations in different ways.
In addition, the warp (pitch sweep)
function can also be setup to vary
according to how hard you play. Of
course, combining techniques just
multiplies your options. Suffice it to
say, the 950 still has a lot of creative
potential flowing through its circuits.
Conclusions
I have to admit the Akai S-950 was
every bit as fun as I hoped it would be.
Although I have a sizable collection
of soft synths and samplers, the last
time I literally had Goosebumps was
while using the 950. Maybe I was
feeling déjà vu or nostalgia. Maybe it
was the realization that only 15,000 of
these were produced and there was
a chance that one of my heroes had
made something incredible on this
very machine. The thought is humbling
and inspiring and almost plausible
considering my test unit has lived in
Long Island, NY for much of its life.
Even if you do not romanticize the
golden era as I do, there is still a lot
to like about the 950. First, there is
the sound. Although, yes the sound is
gritty, the most attractive quality to my
ears is its presence. I get a punch from
the 950 that I don’t get from say an Emu
Ultra or even an Ensoniq EPS/ASR
series sampler. This quality along with
its fast midi response makes it highly
effective for drums. Just pair it with
your sequencer of choice and perhaps
a drum pad controller like Maudio’s
Trigger Finger or Akai’s own MPD 24
and you have a makeshift MPC 60.
Next is flexibility, the 950 allows you
to set up key groups that yield highly
playable drum kits. In addition, its 10
outputs allow you to break instruments
out individually to your mixer or DAW
for more control over the sound. There
is also the workflow. Probably the best
thing about the 950 is how quickly you
can capture your ideas on it. Once
you know your way around, you can
sample sounds as fast as you can find
them. Not only does the interface not
slow you down, you occasionally feel
like it is waiting on you to come up
with the next idea. Another thing I like
about this machine is it requires you
to be connected to your music. While
making a track you have to use your
ears and your gut to make a hundred
little decisions. This involvement draws
you into your music in a way that a DAW
does not (at least not as readily). Lastly,
there is stability. It may or may not
surprise you but the 950 did not crash
or flinch even once during the past few
months. I honestly don’t know what I
would have to do to make it crash. The
main down sides to this machine (e.g.
storage hassles, file conversion issues,
etc.) are just byproducts of its age. In
spite of those limitations, I think the
950 has aged pretty well. I doubt my
any of my current soft sampler will boot
let alone inspire me in 2028 but I have
a feeling my 950 will still be screaming
“Enough Already”. Ultimately, I think
my reaction to the 950 has been more
about rediscovering the fun of throwing
many sounds together quickly and
being reminded that a track does not
have to be technically perfect; it only
has to grab you on an emotional level.
pg_0005
100 Producer’s Edge Magazine Fall Winter
Pros
•Great 12-bit sound •Easy to navigate user interface
•Many sample rates to choose from
•10 outputs allows for flexible routing of sounds to mixer/DAW
•Timestretch feature can be used/misused to great effect
Cons
•Limited memory
•Stores to increasingly hard to find media (floppies and small SCSI
HDs) although third party applications like Awave facilitate transfers to
and from your computer
•Only has one LFO and one (LP) filter which limits synthesis options
•Limited availability of replacement parts and accessories